


Specification:
Name: Bead Embroidery Keychain
Material: Keychain + beads
Bead Type: Full Bead
Category: Pendant
Size: 3x4.7cm/1.18x1.85in
Suitable for the crowd: General
Occasion: Suitable for gift giving, party supplies, wedding travel street photography accessories
DIY bead embroidery steps:
1. Take out the material and prepare it, check the embroidery cloth, and choose the colors from less to more or from more to less according to personal preference. (Wear 1 bead each grid, and bead embroidery only needs half a stitch to make the beads in the same direction, all left or right.) After embroidering the pattern, leave 1-2 more grids on the edge to cut off the excess, and then sew the 2 pieces with 1 strand of fishing line, one grid and one stitch along the edge of the bead.
2. Put the doll cotton inside. (you can feel it right)
3. Fix the key ring when it is sewed to the center or where you like. (how to scan the QR code below)
4. Finally, sew it well, so the beautiful work is completed, it will be a good choice to hang it in the car, in the room or as a gift to friends.
Bead embroidery method:
This bead embroidery is made of 2 strands of small grids, half-embroidered needles, each grid directly wears a bead, the thread goes up from the upper left corner, string the beads, and then go down from the lower right corner, and then wear the second glume beads on the same part according to the above method.
Tips:
Use 1 strand of bead threading thread to thread 1 strand of folded embroidery for sewing fishing line.
Note:
1.All beads must be tilted in the same direction.
2.Due to the different monitor and light effect, the actual color of the item might be slightly different from the color showed on the pictures. Thank you!
3.Please allow 1-2cm measuring deviation due to manual measurement.
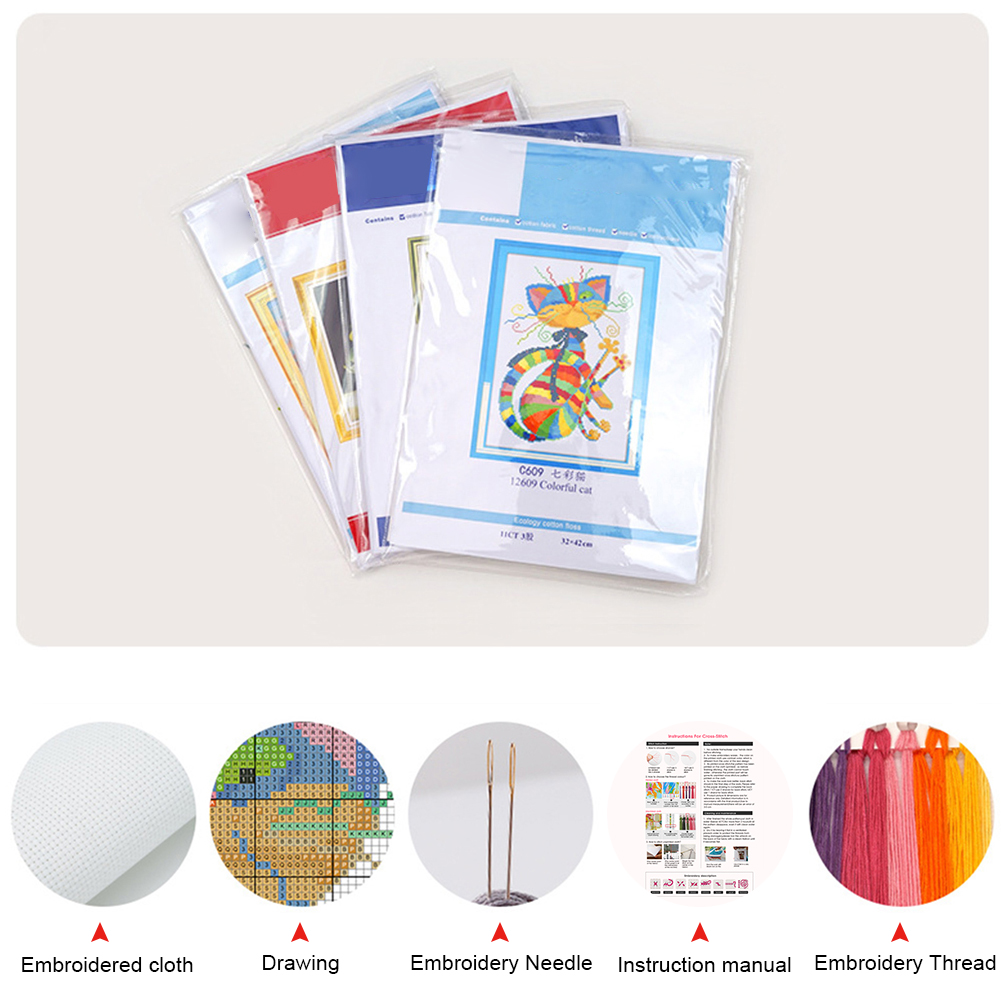
Package Content:
1 x Filling Cotton
1 x Printed Embroidery Cloth
1 x High-quality Embroidery Thread
1 x Embroidery Needles
1 x Enough Beads
1 x Keyring
1 x Drawing
Name: Bead Embroidery Keychain
Material: Keychain + beads
Bead Type: Full Bead
Category: Pendant
Size: 3x4.7cm/1.18x1.85in
Suitable for the crowd: General
Occasion: Suitable for gift giving, party supplies, wedding travel street photography accessories
DIY bead embroidery steps:
1. Take out the material and prepare it, check the embroidery cloth, and choose the colors from less to more or from more to less according to personal preference. (Wear 1 bead each grid, and bead embroidery only needs half a stitch to make the beads in the same direction, all left or right.) After embroidering the pattern, leave 1-2 more grids on the edge to cut off the excess, and then sew the 2 pieces with 1 strand of fishing line, one grid and one stitch along the edge of the bead.
2. Put the doll cotton inside. (you can feel it right)
3. Fix the key ring when it is sewed to the center or where you like. (how to scan the QR code below)
4. Finally, sew it well, so the beautiful work is completed, it will be a good choice to hang it in the car, in the room or as a gift to friends.
Bead embroidery method:
This bead embroidery is made of 2 strands of small grids, half-embroidered needles, each grid directly wears a bead, the thread goes up from the upper left corner, string the beads, and then go down from the lower right corner, and then wear the second glume beads on the same part according to the above method.
Tips:
Use 1 strand of bead threading thread to thread 1 strand of folded embroidery for sewing fishing line.
Note:
1.All beads must be tilted in the same direction.
2.Due to the different monitor and light effect, the actual color of the item might be slightly different from the color showed on the pictures. Thank you!
3.Please allow 1-2cm measuring deviation due to manual measurement.
Package Content:
1 x Filling Cotton
1 x Printed Embroidery Cloth
1 x High-quality Embroidery Thread
1 x Embroidery Needles
1 x Enough Beads
1 x Keyring
1 x Drawing
What is cross stitch?
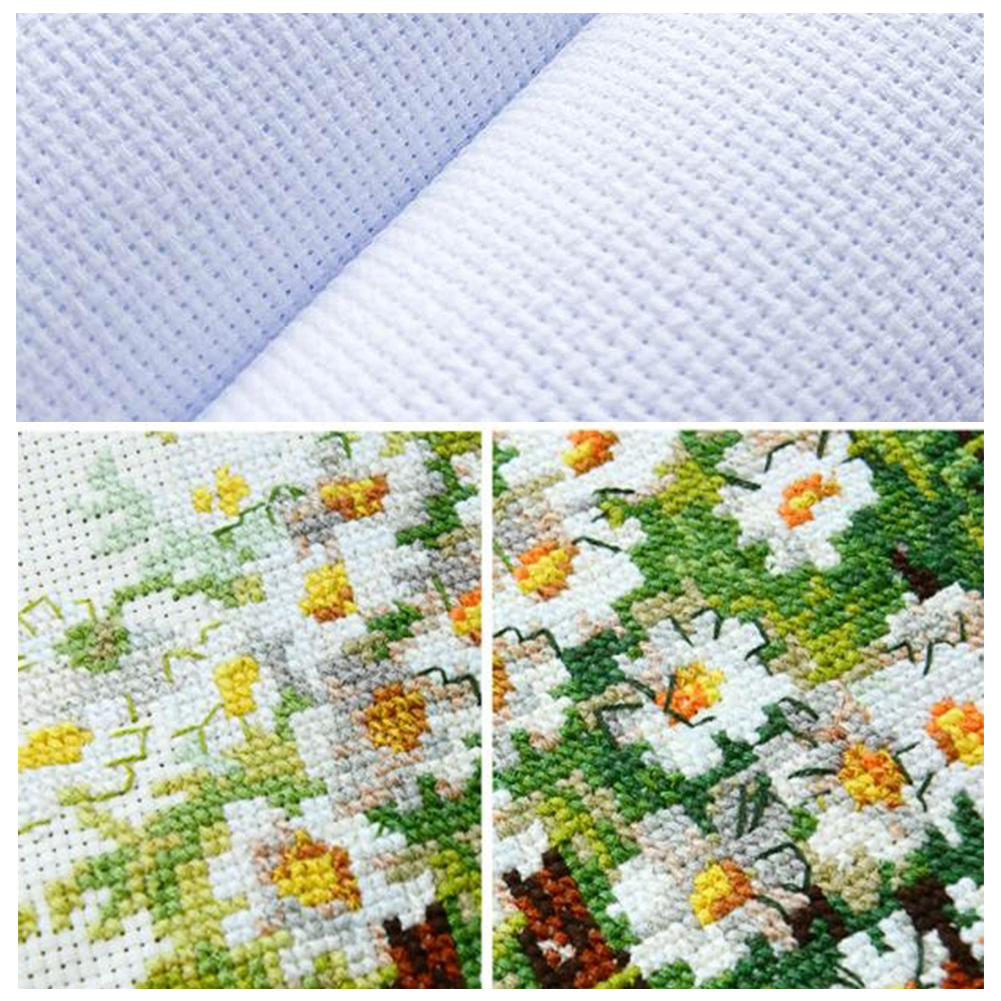
As we know, Cross stitch is a form of counted thread embroidery that has been around for ages, and it is one of the easiest forms of hand embroidery to learn. Cross stitch is comprised of X-shaped stitches done on fabric with an even and open weave like Aida or linen. Designs can be traditional or modern or anywhere in between.
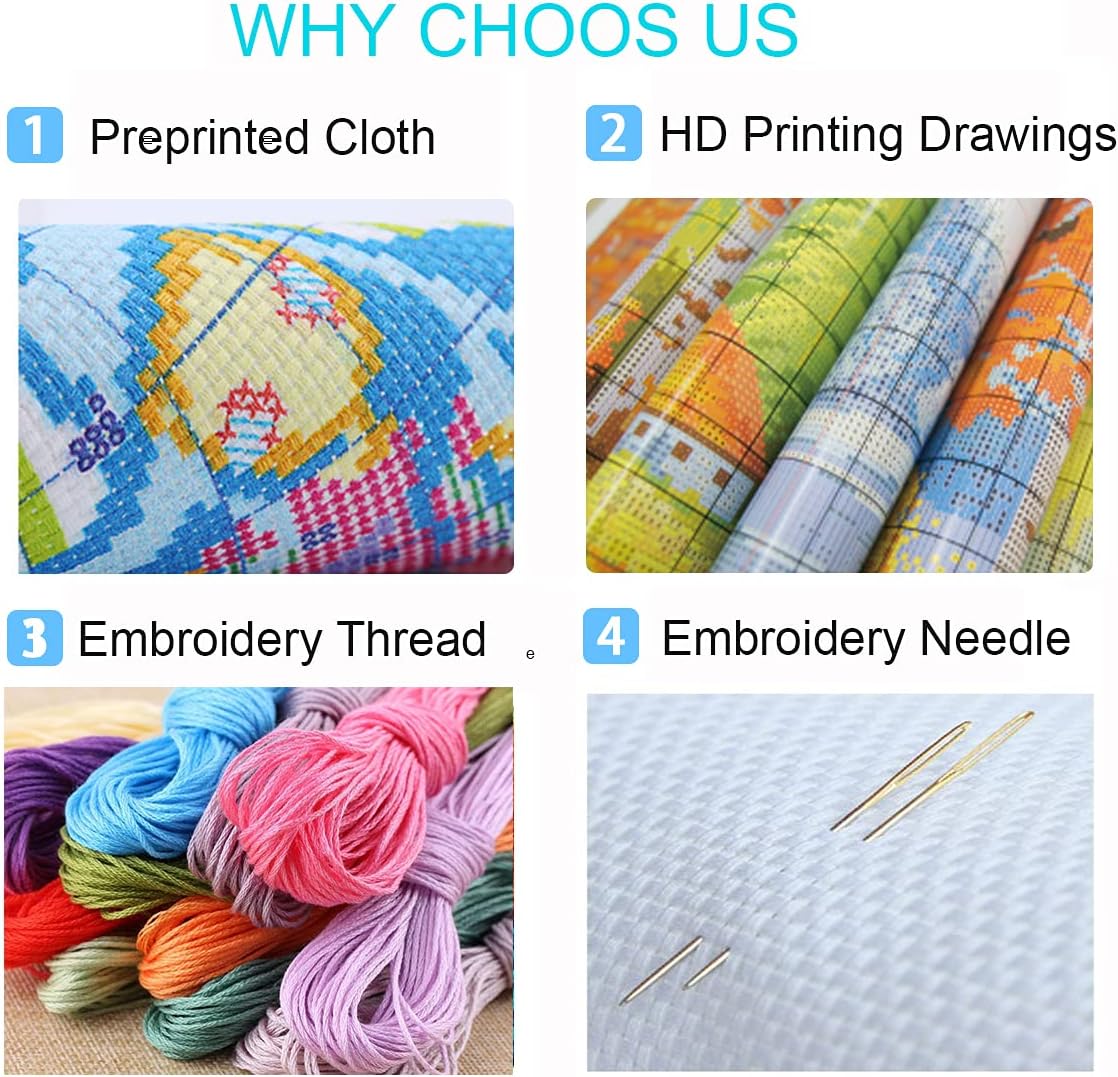
Our store provide Cross stitch projects sold as kits, which brings convenience to customers. You don't need to purchase fabric and thread separately, also there are many different patterns to choose from. On sale cross stitch kits have two types, one is Stamped Printed Cross Stitch (suitable for beginners and interested users), and the other is Counted Cross Stitch (suitable for a certain degree of familiarity with cross stitch)
Stamped Cross Stitch vs Counted Cross Stitch
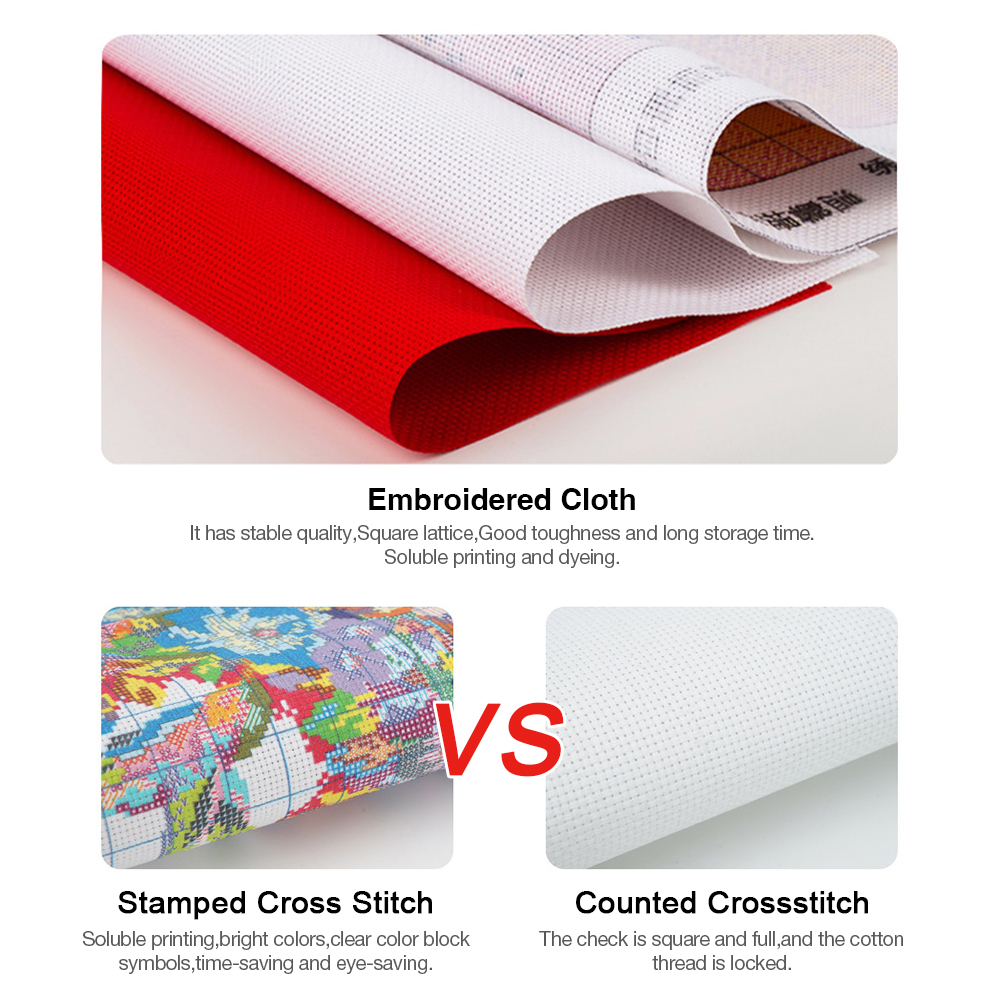
Stamped Printed Cross Stitch
As shown in the figure below, the characteristic of Stamped Printed Cross Stitch lies in the Canvas. The canvas has the colorful position area of the corresponding design pattern and the mark of the corresponding embroidery thread, which can help us to locate when we sew the cross stitch and choose the embroidery thread that should be used in the corresponding position.
Note: The background color displayed on the canvas does not represent the color of the actual pattern. This color is only used for mark matching. Please refer to the color card color corresponding to the corresponding mark.In addition, after the printed cross stitch is finished, it needs to be washed to remove the background color of the canvas.(Such as the other picture,"03" real color is the corresponding thread color)
Shop Now
Counted Cross Stitch
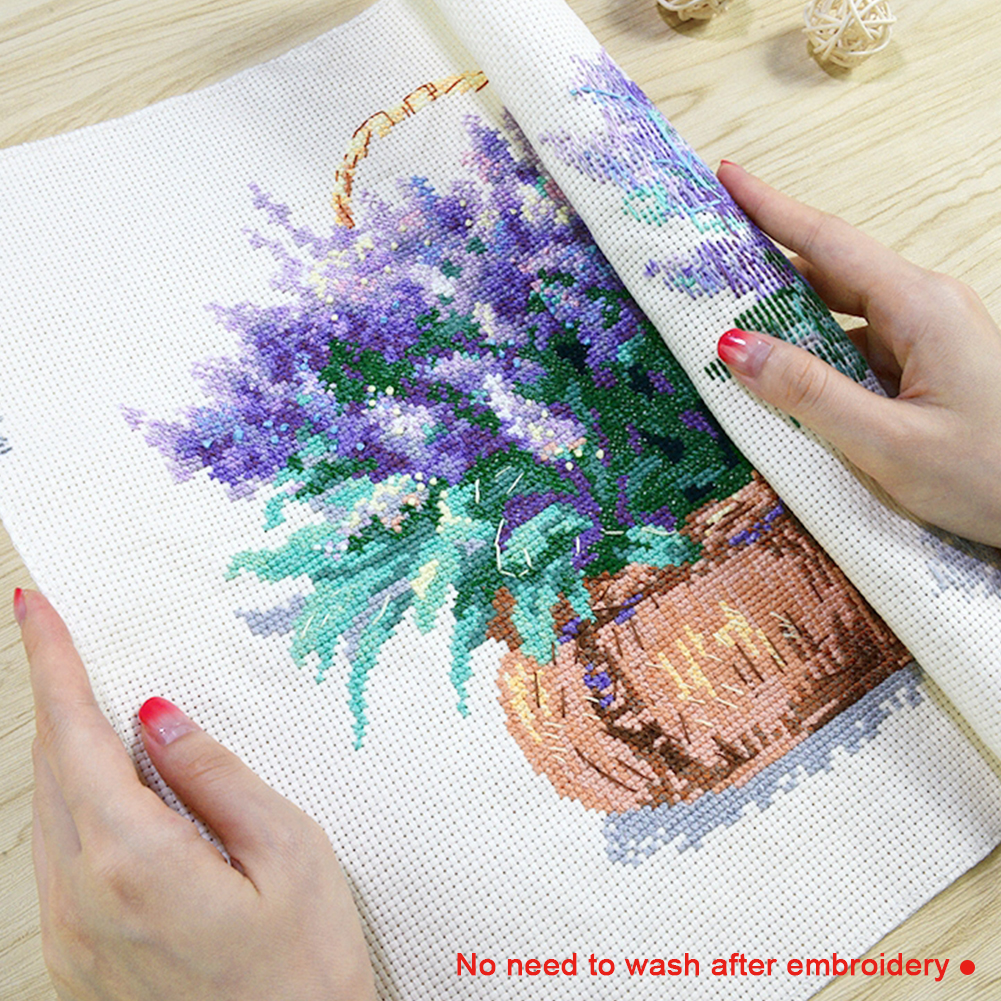
Counted Cross Stitch is more suitable for customers who have a certain degree of proficiency in cross stitch, and like to play and challenge more. Because the canvas of the counting cross stitch kit does not have the bottom color mark like the printed cross stitch. The user needs to count and confirm the center position according to the grid of the canvas and start sewing. But this also means that there is more room for maneuverability, and customers can play or design according to their own preferences.(Counted Cross Stitch not need to wash after finished.)
Shop Now
As we know, Cross stitch is a form of counted thread embroidery that has been around for ages, and it is one of the easiest forms of hand embroidery to learn. Cross stitch is comprised of X-shaped stitches done on fabric with an even and open weave like Aida or linen. Designs can be traditional or modern or anywhere in between.
Our store provide Cross stitch projects sold as kits, which brings convenience to customers. You don't need to purchase fabric and thread separately, also there are many different patterns to choose from. On sale cross stitch kits have two types, one is Stamped Printed Cross Stitch (suitable for beginners and interested users), and the other is Counted Cross Stitch (suitable for a certain degree of familiarity with cross stitch)
Stamped Cross Stitch vs Counted Cross Stitch
Stamped Printed Cross Stitch
As shown in the figure below, the characteristic of Stamped Printed Cross Stitch lies in the Canvas. The canvas has the colorful position area of the corresponding design pattern and the mark of the corresponding embroidery thread, which can help us to locate when we sew the cross stitch and choose the embroidery thread that should be used in the corresponding position.
Note: The background color displayed on the canvas does not represent the color of the actual pattern. This color is only used for mark matching. Please refer to the color card color corresponding to the corresponding mark.In addition, after the printed cross stitch is finished, it needs to be washed to remove the background color of the canvas.(Such as the other picture,"03" real color is the corresponding thread color)
Shop Now
Counted Cross Stitch
Counted Cross Stitch is more suitable for customers who have a certain degree of proficiency in cross stitch, and like to play and challenge more. Because the canvas of the counting cross stitch kit does not have the bottom color mark like the printed cross stitch. The user needs to count and confirm the center position according to the grid of the canvas and start sewing. But this also means that there is more room for maneuverability, and customers can play or design according to their own preferences.(Counted Cross Stitch not need to wash after finished.)
Shop Now
What is Stamped Cross Stitch?
Stamped Printed Cross Stitch has canvas with background color mark. The canvas has the colorful position area of the corresponding design pattern and the mark of the corresponding embroidery thread, which can help us to locate when we sew the cross stitch and choose the embroidery thread that should be used in the corresponding position.
GO TO BUY NOW!!
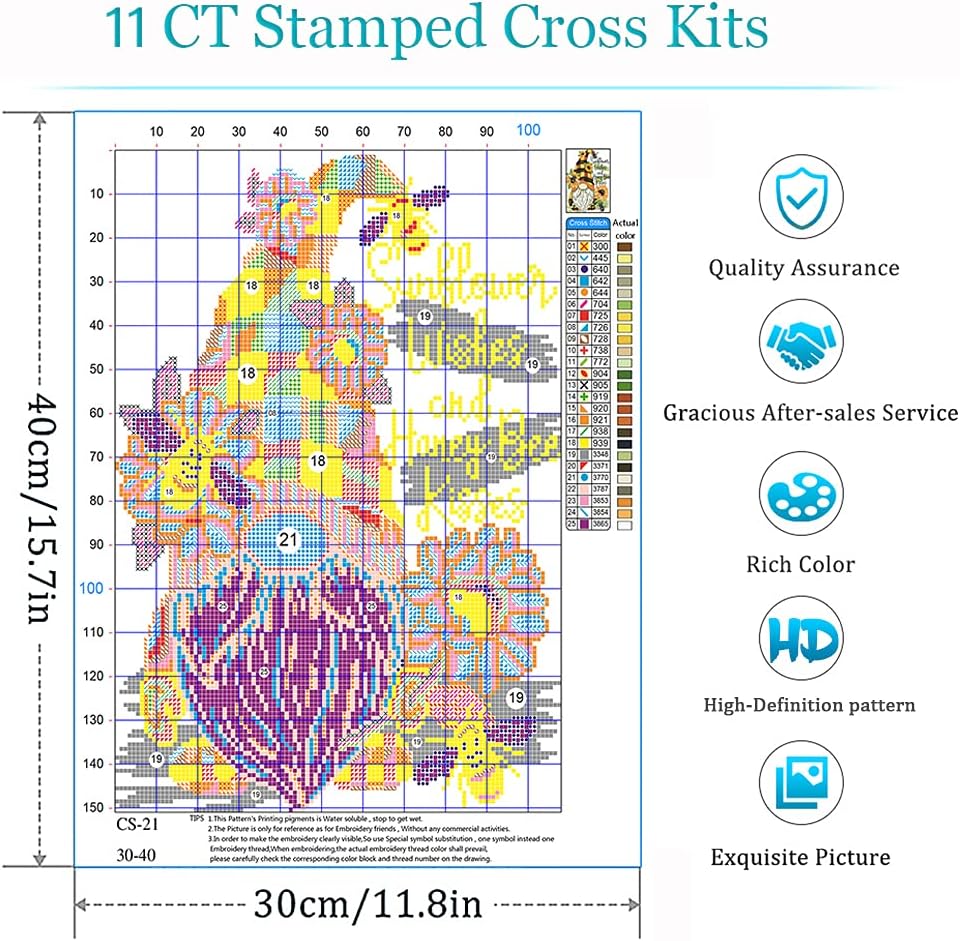
11CT Stamped Cross Stitch>>
14CT Stamped Cross Stitch>>

Why choose our Stamped Cross Stitch?
How to do?
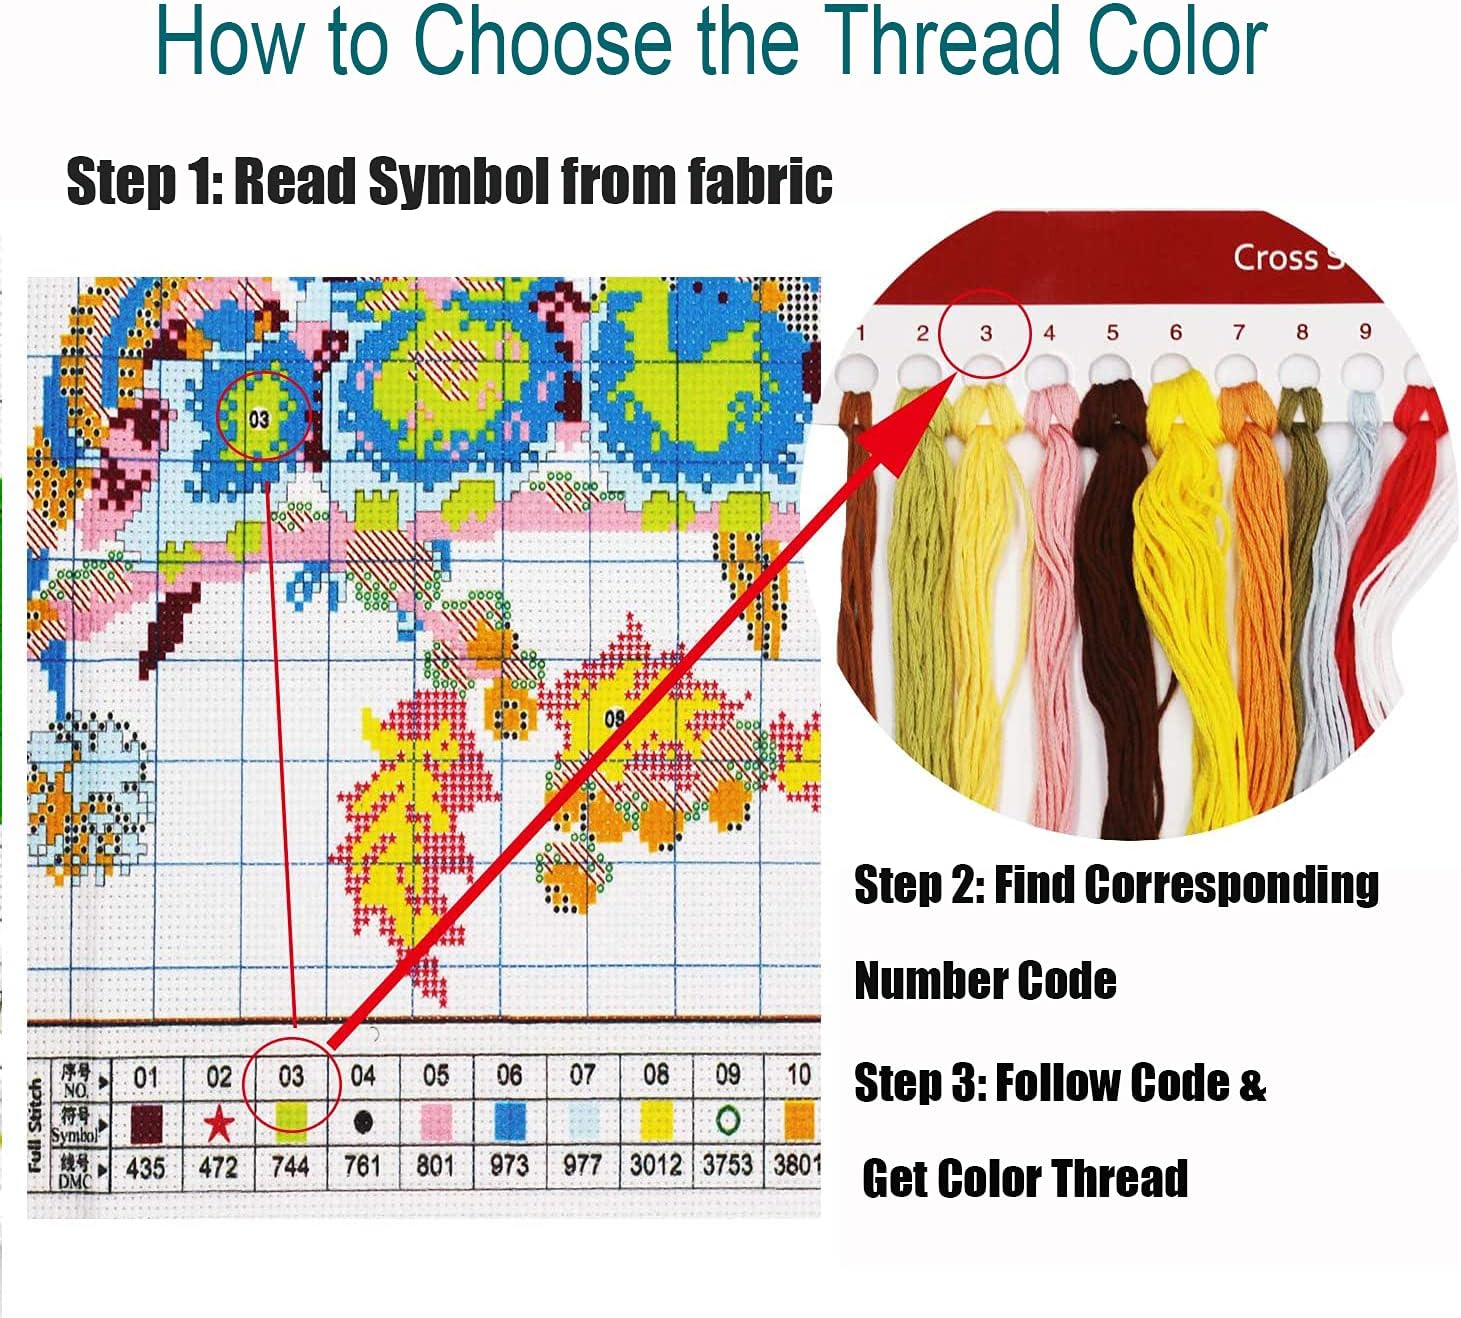
Step 2: Choose the Thread Color
Note:
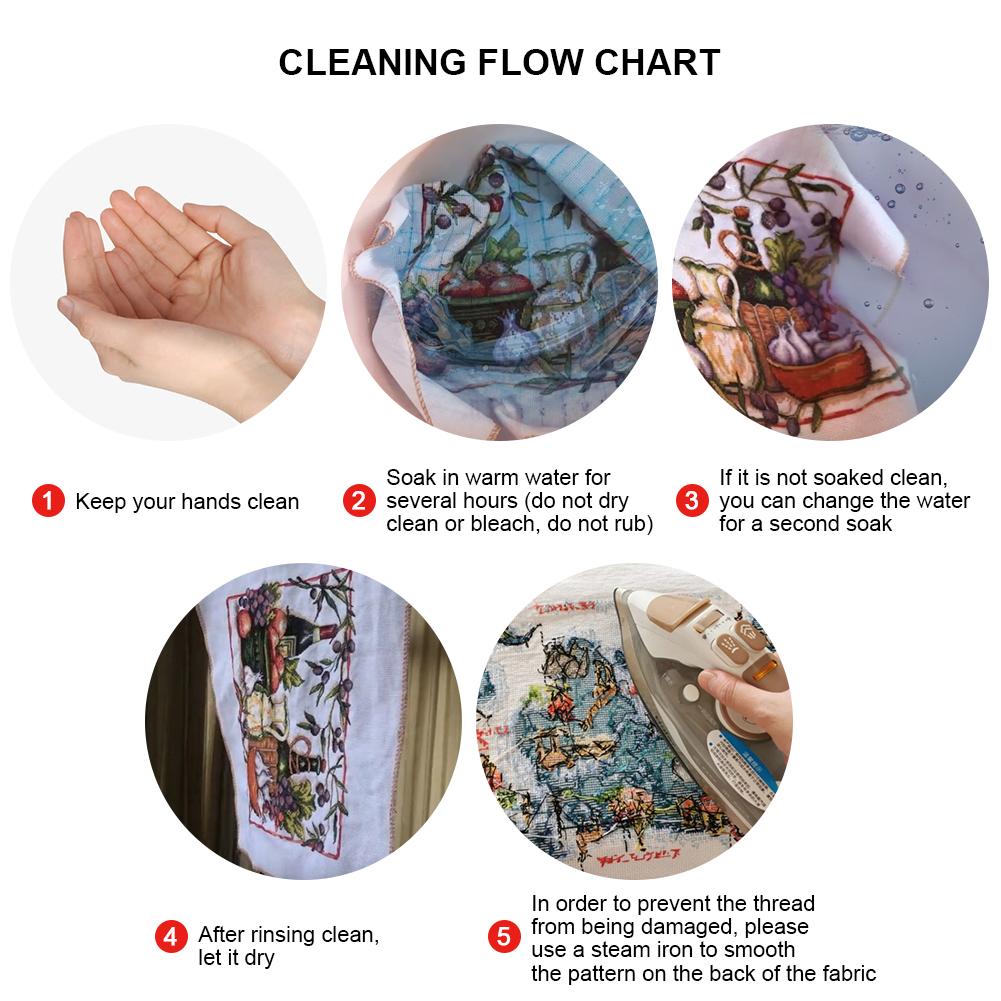
1. Make sure your hands are clean before embroidering
2. After the cross stitch is finished, soak it in warm water for a few hours, do not rub it, rinse it and dry it.
3. Ironing is to move the iron back and forth to make the embroidered cloth smooth and not hurt the thread.
4. The color blocks in the picture do not represent the real color of thread. Please carefully identify the symbol or serial number corresponding to the color block, and select the wire number according to the serial number requirements.
Stamped Printed Cross Stitch has canvas with background color mark. The canvas has the colorful position area of the corresponding design pattern and the mark of the corresponding embroidery thread, which can help us to locate when we sew the cross stitch and choose the embroidery thread that should be used in the corresponding position.
GO TO BUY NOW!!
11CT Stamped Cross Stitch>>
14CT Stamped Cross Stitch>>
Why choose our Stamped Cross Stitch?
How to do?
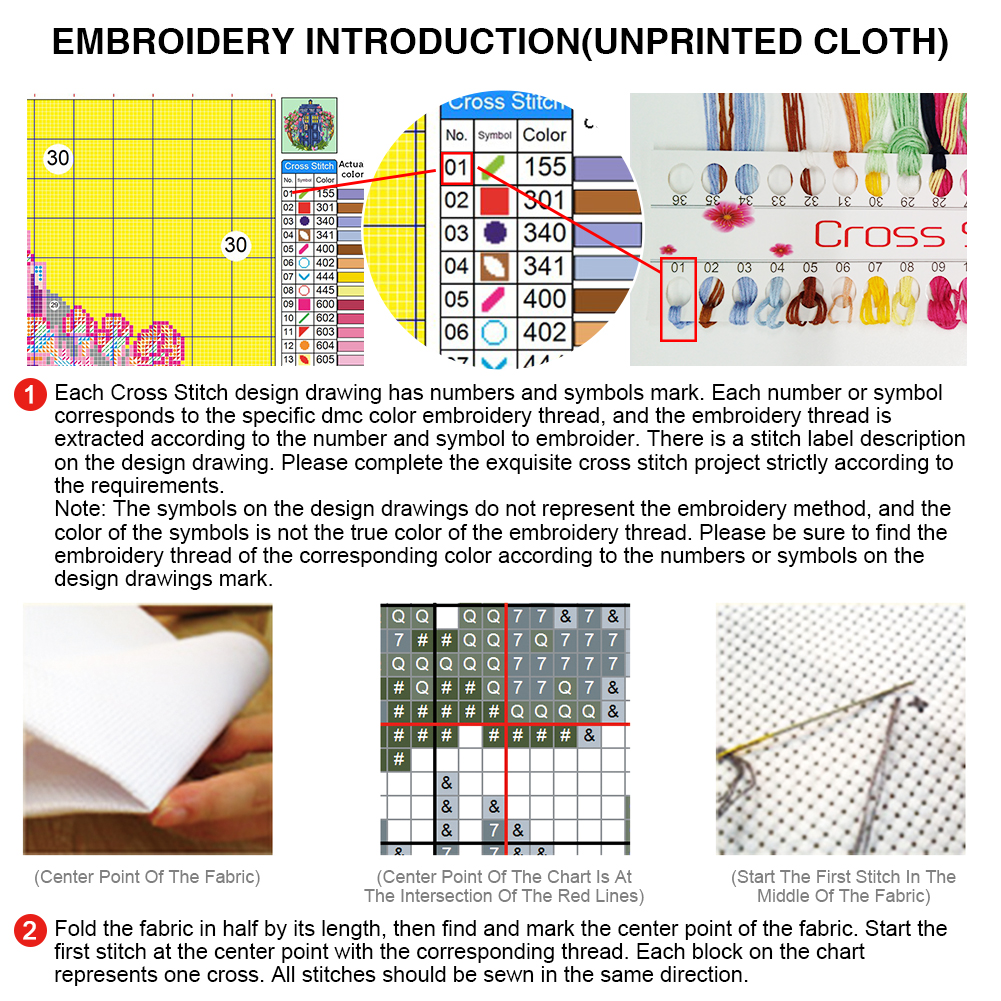
Step 1: Reading a cross stitch chart
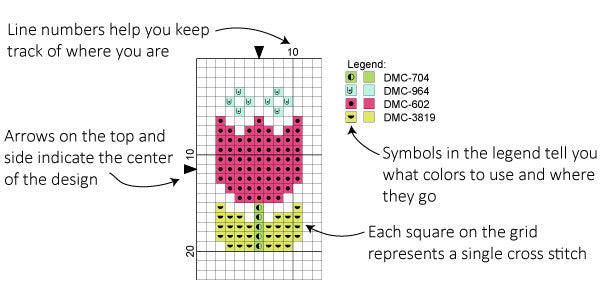
A cross stitch chart tells you everything you need to know about where to stitch and what color to use. The grid on a cross stitch chart corresponds to the grid created by the weave of the fabric, and each colored square on the chart represents a cross stitch.
A combination of colors and symbols in the squares (or symbols only if the chart is black-and-white) tell you which color of floss to use. Use the chart legend to map the symbols to the floss colors.
Step 2: Choose the Thread Color
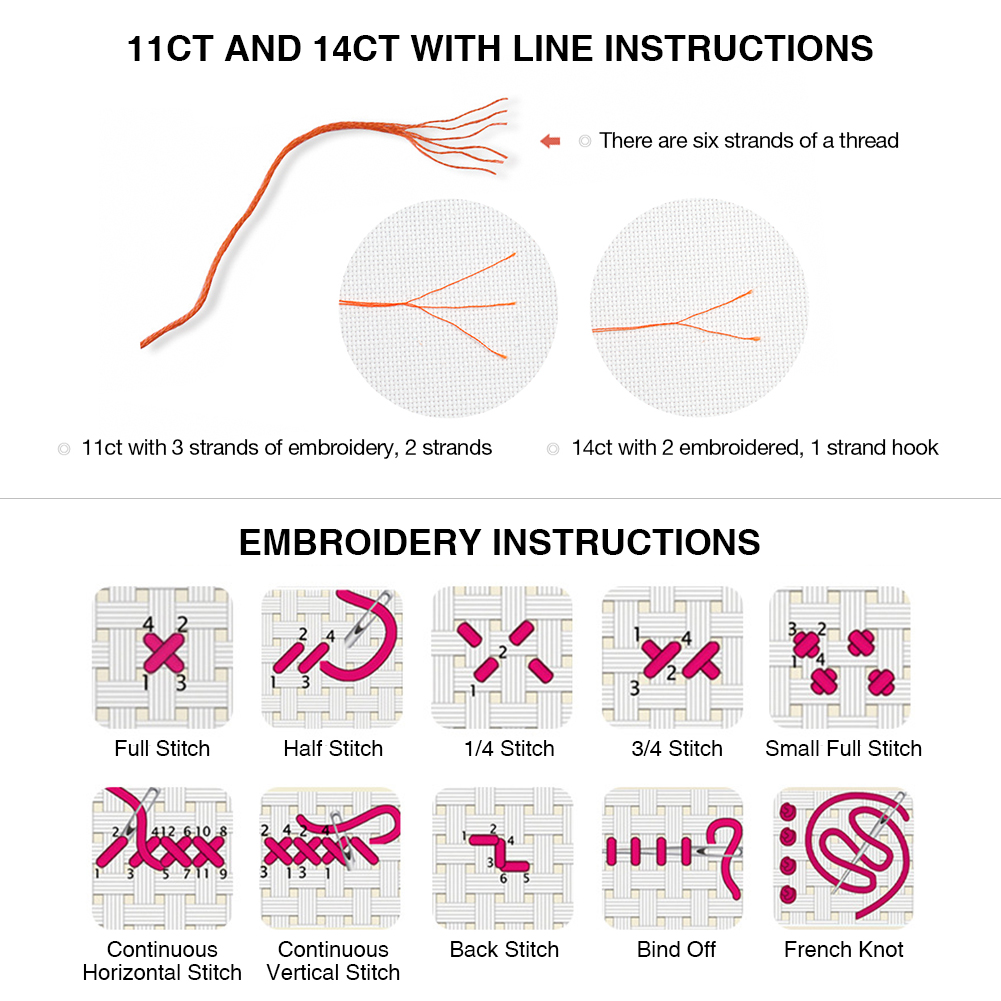
Step 3: Thread Line instructions
Step 4: Wash Finished Stamped Cross Stitch Canvas
Note:
1. Make sure your hands are clean before embroidering
2. After the cross stitch is finished, soak it in warm water for a few hours, do not rub it, rinse it and dry it.
3. Ironing is to move the iron back and forth to make the embroidered cloth smooth and not hurt the thread.
4. The color blocks in the picture do not represent the real color of thread. Please carefully identify the symbol or serial number corresponding to the color block, and select the wire number according to the serial number requirements.
What is Counted Cross Stitch?
Counted Cross stitch is a form of counted thread embroidery that has been around for ages, and it is one of the easiest forms of hand embroidery to learn. Cross stitch is comprised of X-shaped stitches done on fabric with an even and open weave like Aida or linen. Designs can be traditional or modern or anywhere in between
GO TO BUY NOW!!
11CT Counted Cross Stitch>>
14CT Counted Cross Stitch>>
Why choose our Counted Cross Stitch?
Our store provide Cross stitch projects sold as kits, which brings convenience to customers. You don't need to purchase fabric, thread and needle separately, also there are many different patterns to choose from. We all prepare for you!
How to do?
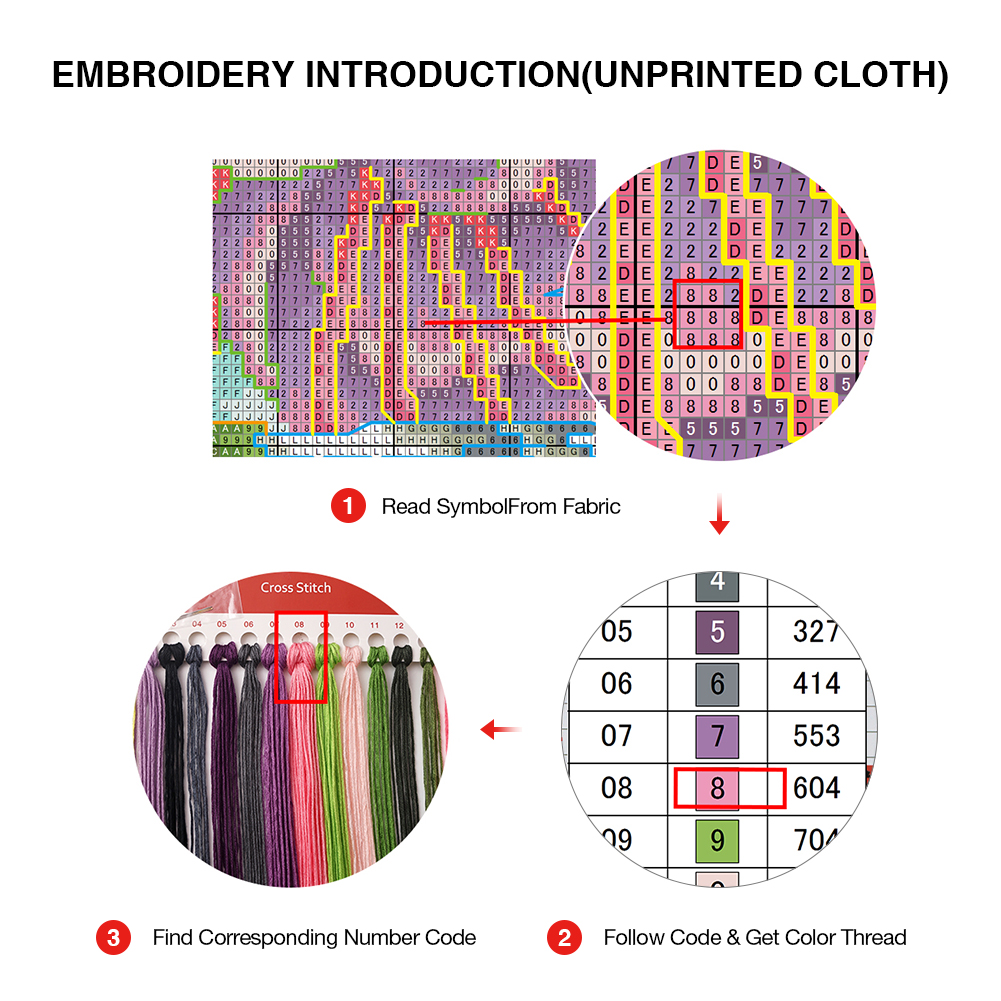
Step 2: Embroidery instroduction
Note:
1. Make sure your hands are clean before embroidering
2. Ironing is to move the iron back and forth to make the embroidered cloth smooth and not hurt the thread.
3. The color blocks in the picture do not represent the real color of thread. Please carefully identify the symbol or serial number corresponding to the color block, and select the wire number according to the serial number requirements.
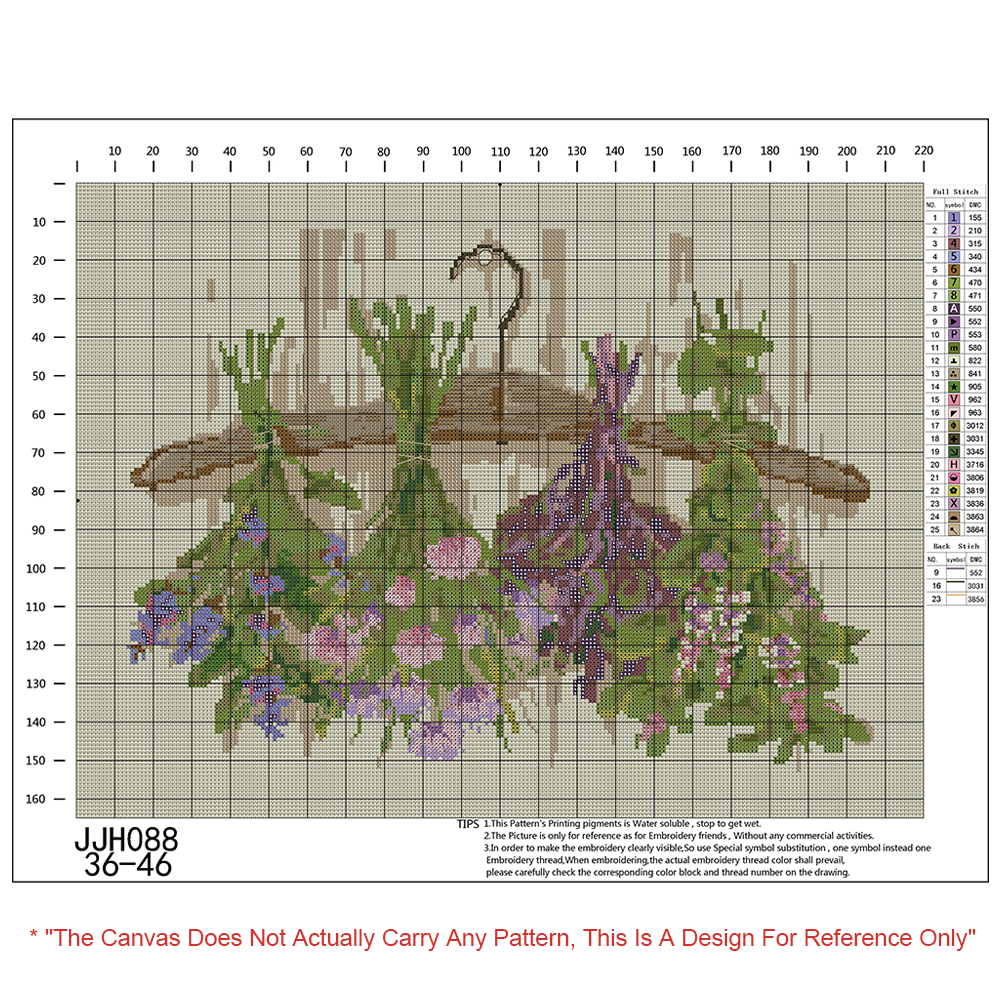
4. In order to allow customers to sew patterns better, we provide electronic design drawings to help customers better understand the sewing layout
(The canvas for Counted Cross Stitch do not have any patterns or colors, this picture only for design reference.)
Counted Cross stitch is a form of counted thread embroidery that has been around for ages, and it is one of the easiest forms of hand embroidery to learn. Cross stitch is comprised of X-shaped stitches done on fabric with an even and open weave like Aida or linen. Designs can be traditional or modern or anywhere in between
GO TO BUY NOW!!
11CT Counted Cross Stitch>>
14CT Counted Cross Stitch>>
Why choose our Counted Cross Stitch?
Our store provide Cross stitch projects sold as kits, which brings convenience to customers. You don't need to purchase fabric, thread and needle separately, also there are many different patterns to choose from. We all prepare for you!
How to do?
Step 1: Reading a cross stitch chart
A cross stitch chart tells you everything you need to know about where to stitch and what color to use. The grid on a cross stitch chart corresponds to the grid created by the weave of the fabric, and each colored square on the chart represents a cross stitch.
A combination of colors and symbols in the squares (or symbols only if the chart is black-and-white) tell you which color of floss to use. Use the chart legend to map the symbols to the floss colors.
Step 2: Embroidery instroduction
Step 3: Thread Line instructions
Note:
1. Make sure your hands are clean before embroidering
2. Ironing is to move the iron back and forth to make the embroidered cloth smooth and not hurt the thread.
3. The color blocks in the picture do not represent the real color of thread. Please carefully identify the symbol or serial number corresponding to the color block, and select the wire number according to the serial number requirements.
4. In order to allow customers to sew patterns better, we provide electronic design drawings to help customers better understand the sewing layout
(The canvas for Counted Cross Stitch do not have any patterns or colors, this picture only for design reference.)
You May Also Like
Don't Like These?
Hot selling series


Customer Reviews
Wow you reached the bottom
Newest
Most liked
Highest ratings
Lowest ratings
×
![]()
${function(){
const limit = typeof data === 'number' ? data : 0;
return `
Pictures/Videos (${limit || 0}/5)
` }()}
${(function(){
const closeIcon =
'';
if (item.type === 'image') {
return `
${closeIcon}
`
}
return `
${closeIcon}
`
})()}
The review would not show in product details on storefront since it does not support to.